Fresh Job, fresh Laptop, and some fresh (and some old) learning to do.
Going for the VCAP-DCV certification again, I needed a minimal lab environment inside VMware Workstation. The VCSA demands forward and reverse DNS resolving, and in the previous ‘flufflab/flufflap’, I had used BIND running in Ubuntu for this purpose. (and before that, I had always run a full Windows AD server).
This time I wanted something very lightweight with a minimal ram footprint. Now I am currently also studying Kubernetes and many of the associated CNCF (Cloud Native Compute Foundation) projects.
One of the key components of any Kubernetes environment is the ability to do service discovery through DNS. It is so core to the functioning of Kubernetes, that Kubernetes ships with its own DNS server built-in.

CoreDNS started out its life as a separate project, was adopted by the CNCF in 2017 and as of version 1.13 of Kubernetes, ships as its default DNS server, replacing the previous ‘kube-dns’.
CoreDNS , originally written by Miek Gieben, is written in Google’s Go language, and is powerfully modular, using a plugin-architecture. While it comes with Kubernetes, it can of course be run separately, either making (compiling) it yourself, or consuming it as a container, which is what I planned to do.
My main example running CoreDNS for your lab, comes from Robb Manes. Please read his blog post here. Rob goes into more detail about the DNS zone files themselves, which I will not do here. And the only difference between his setup and mine, is that I added a reverse-lookup zone, as vCenter (VCSA) requires this.
I forsee running all kinds of tools that come as a container, eventually in a Kubernetes install, but to get started I needed a simple single docker host. So I go with my go-to Linux distro; VMware Photon OS.
Now before you start, think carefully about your network topology and set up your network requirements beforehand in VMware Workstation. For instance, you will want your DNS (and thus the docker host) to have a static IP.
Installing Photon OS

I went with the minimal ISO Image of Photon 3.0. This will deploy a VM by default with 768MB of RAM, but you could even reduce this further. (remember that if you are running almost nothing in the VM, most of that RAM is shareable for Wndows anyway.)
There are a few things you have to do to prepare the OS:
— Turn on SSH –>
https://vmware.github.io/photon/assets/files/html/3.0/photon_troubleshoot/permitting-root-login-with-ssh.html
— Enable docker… it is disabled by default in the minimal ISO, so:
systemctl enable docker
systemctl start docker
— Optionally install the bindutils package, that contains tools such as ‘dig’ –> tdnf install bindutils
— Because we are going to use this Docker host as a DNS Server using the CoreDNS docker image, we need to disable PhotonOS’ own DNS resolver. ( see:
https://github.com/sameersbn/docker-bind/issues/65 )
systemctl stop systemd-resolved
systemctl disable systemd-resolved
CoreDNS
CoreDNS works with standard DNS zone files, and its own, very simple config file, the ‘Corefile’. So I will have 3 files in total:
– The CoreDNS Core file (Corefile)
– My forward looking zone file (db.flufflap.local)
– My Reverse lookup zone file (db.192.168.28)
Since this is a very simple setup, and I am only working with a single host, I can save these files locally on the docker host itself. If I wanted to make DNS highly available, I would need to think of a smarter way of saving this static data.
I place these 3 files in a directory /static_data/coredns_config in my PhotonOS docker host

When running coreDNS as a container, I use use the docker –volume switch to mount this directory inside the container under /root/
That means for the container, the corefile can be found as /root/Corefile
By Default, CoreDNS looks for the Corefile in the same directory as its self, but this can be overridden with the -conf option
So the docker command to run CoreDNS, looks like this:
docker run -d --name coredns --rm --volume=/static_data/coredns_config/:/root/ -p 53:53/udp coredns/coredns -conf /root/CorefileNow I am using –rm (remove) to make sure that once this docker process ends, the container is automatically deleted. I do this because right now I am frequently adding zone data to my zone files, and I want to force CoreDNS to use fresh zone data every time. I found that if I simply restart the CoreDNS container, it wont always use the new DNS data.
Alternatively, you can use –restart to force docker to always run the container. This is useful if you plan to shutdown your docker host regularly.
Corefile
The Corefile is the main configuration file for CoreDNS. For a full explanation of how it can be configured, read this: https://coredns.io/2017/07/23/corefile-explained/
My corefile is rather simple:
.:53 {
    forward . 8.8.8.8 9.9.9.9
    log
    errors
}
flufflap.local:53 {
    file /root/db.flufflap.local
    log
    errors
}
192.168.28.0/24:53 {
    file /root/db.192.168.28
    log
    errors
}
I have 3 sections, and in each I am using just 3 plugins. With the Forward plugin, I am telling CoreDNS to forward queries for every domain ( “.” ) to google DNS.
But then I am telling it to resolve flufflap.local and its reverse zone (for the 192.168.28.0 subnet) itself, using the file plugin. And here I refer the sections to the corresponding zone files.
CoreDNS will use the domain section that is the most descriptive for a query. So it will choose ‘flufflap.local’ , as a specific domain, over ‘.’ , which represents all domains. So the order of the sections doesn’t matter.
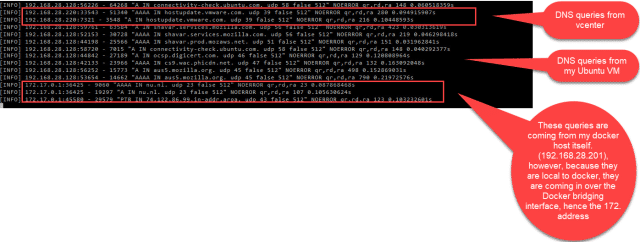
I am also using the log plugin, to log every DNS query. You would usually not have this on in production environments, as its superfluous. The errors plugin, will throw any errors to the standard log (or standard out) also.
We can view the containers log with the docker logs command. I am using this mostly for troubleshooting while I am setting up the lab, I have a terminal window open all the time that lets me see all the queries that are being made. The command is docker logs coredns -f (-f for follow)

Once the lab is stable, I will probably turn off the logging plugin by removing it from the sections of the Corefile.
There are a huge amount of plugins for CoreDNS, many built-in, and many made by the community. The integration with Kubernetes relies on the built-in Kubernetes plugin. For more information, have a look at
https://coredns.io/manual/plugins/
Zone Files
My zone files are pretty straightforward. I copy-pasted them from elsewhere with minimal edits.
db.flufflap.local:
$ORIGIN flufflap.local.
@	3600 IN	SOA fluffdock1.flufflap.local. mail.flufflap.local. (
				2017042745 ; serial
				7200       ; refresh (2 hours)
				3600       ; retry (1 hour)
				1209600    ; expire (2 weeks)
				3600       ; minimum (1 hour)
				)

	3600 IN NS a.iana-servers.net.
	3600 IN NS b.iana-servers.net.

fluffdock1 IN A 192.168.28.201
fluffdock2 IN A	192.168.28.202
fluffcenter1 IN A 192.168.28.220
fluffcenter2 IN A 192.168.28.221
fluffesx1 IN A 192.168.28.230
fluffesx2 IN A 192.168.28.231
fluffesx3 IN A 192.168.28.232
db.192.168.28:
$TTL    604800
@       IN      SOA     fluffdock1.flufflap.local. mail.flufflap.local. (
                              2         ; Serial
                         604800         ; Refresh
                          86400         ; Retry
                        2419200         ; Expire
                         604800 )       ; Negative Cache TTL
;
; name servers - NS records
        IN      NS      fluffdock1.flufflap.local.

;
; PTR Records
201     IN      PTR     fluffdock1.flufflap.local.    ; 192.168.28.201
202     IN      PTR     fluffdock2.flufflap.local.    ; 192.168.28.202
220     IN      PTR     fluffcenter1.flufflap.local.  ; 192.168.28.220
221     IN      PTR     fluffcenter2.flufflap.local.  ; 192.168.28.221
230     IN      PTR     fluffesx1.flufflap.local.     ; 192.168.28.230
231     IN      PTR     fluffesx2.flufflap.local.     ; 192.168.28.231
232     IN      PTR     fluffesx3.flufflap.local.     ; 192.168.28.232
As a final step, you could add to your network config, the docker hosts own public IP listed as the DNS server
(instead of the default that was listed here, which may have been google, or VMware workstation default gateway, acting as a DNS proxy).
That way, from for PhotonOS, you are using CoreDNS inside the container to do all of your DNS resolving. The advantage of this, is that you can also resolve all your lab internal DNS names from inside your docker host. This will be useful when you want to do more on your docker host than only host the CoreDNS container.

For more information on CoreDNS, check out the official website:
https://coredns.io/
Also have a look at these youtube videos:

And for the full manual:
https://www.amazon.com/Learning-CoreDNS-Configuring-Native-Environments/dp/1492047961
The original article was posted on: thefluffyadmin.net


