Due to some issues with the migration coordinator and OSPF(maybe I make a post about that later), we decided to go for another migration strategy for another NSX-V to NSX-T migration.
In short we are using the migration coordinator but we will manually cutover the edges so we have more control over the north to south routing.
That means we are using the “In-Place Migration of Specific Parts of NSX-V; Migrating Distributed Firewall Configuration, Hosts, and Workloads:
One of the prerequisites is;
- Create overlay segments in NSX-T with the same virtual network identifier (VNI) and subnet address as the Logical Switches in NSX-V
The environment isn’t that big, but I decided to challenge myself and create the logicalswitches via RestApi and Postman with a data-file. A long time ago I used the same combination to add multiple vLANs to an Cisco UCS environment. So I knew it was possible.
Obviously you need to download postman and create an account. I tested this on my lab so no production environment was harmed in the making of this is short walkthrough.
Steps
- Create a Workspace in postman
- After that create the collection for the request you want to run

- Set basic Auth for NSX-T manager on your collection

- Add a request to the collection with the URL and following authorization and params;
https://nsxt.tarantino.local/policy/api/v1/infra/segments/{{ID}}?force=true

- In the Body make sure you;
- set the transportzone ID to the appropriate ID
- Connectivity_path is the absolute path to your Tier0 or Tier1 gateway
- Things to keep in mind;
- I used an advanced config setting [connectivity: Off] and did not define a subnet/gateway because we are doing a manual edge-Cutover during migration so there are 2 different request below please adjust it to your needs.
#Connectivity to Off and no Subnet/Gateway
{ "type" : "ROUTED",
  "connectivity_path" : "/infra/tier-0s/T0-GW-01",
  "transport_zone_path" : "/infra/sites/default/enforcement-points/default/transport-zones/3eb63e46-67ec-43f4-91af-b598b4b0c329",
  "overlay_id": {{VNI}},
  "admin_state" : "UP",
  "replication_mode" : "MTEP",
  "resource_type" : "Segment",
  "id" : "{{ID}}",
  "display_name" : "{{ID}}",
  "path" : "/infra/segments/{{ID}}",
  "relative_path" : "{{ID}}",
  "parent_path" : "/infra",
  "advanced_config": {
   "connectivity": "OFF"
  }
}

#Request with Subnet/Gateway en Connectivity on default;
{ "type" : "ROUTED",
  "subnets" : [ {"gateway_address" : "172.16.20.1/24",
    "network" : "172.16.20.0/24"} ],
  "connectivity_path" : "/infra/tier-0s/T0-GW-01",
  "overlay_id":{{VNI}},
  "admin_state" : "UP",
  "replication_mode" : "MTEP",
  "resource_type" : "Segment",
  "id" : "{{ID}}",
  "display_name" : "{{ID}}",
  "path" : "/infra/segments/{{ID}}",
  "relative_path" : "{{ID}}",
  "parent_path" : "/infra"
}- Set the body Type to RAW and jSON

- In the pre-request script field we need to do some javascript magic so the variables are populated from the imported jSON
let id = pm.iterationData.get("ID")
let vni = pm.iterationData.get("vni")- Now we must create a input jSON data file to use
[
{
        "ID": "test1",
        "VNI": "9001"
},
{
        "ID": "test2",
        "VNI": "9002"
},
{
        "ID": "test3",
        "VNI": "9003"
}
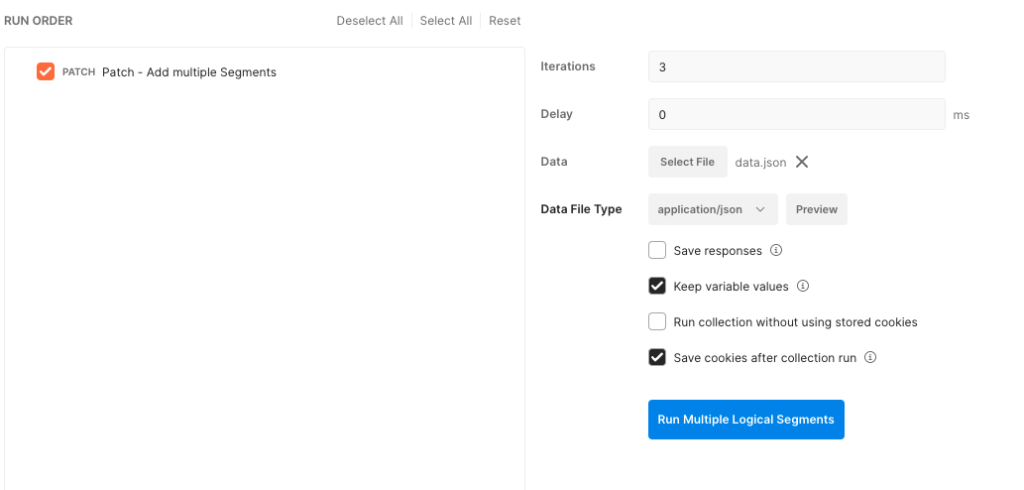
]- Now some postman magic with the ” runner” found at the bottom of the screen.
- Select the datafile you created en click preview to validate.
- Postman Automatically adjust the iterations on the number of object you have defined

- Last stap is to drag the request from the left in the run order;
- then click Run
- After a few moments the segments have been added to NSX-T

- Check NSX-T manager to verify the logical segments has been added.

Troubleshooting
- In the result screen you can see the status ( 200 OK, is what you wan’t to see).
- You can also click on “Patch – Add Multiple” to see the request body which you can use to see what request was send to the NSX-T manager en make some adjustments

The original article was posted on: www.ruudharreman.nl


