I wanted to get client certificate authentication working on a development environment. The environment in this case is a Windows 8.1 laptop so that implies IIS 8.5. It involves a significant number of steps so this will be a long post.
Configure IIS
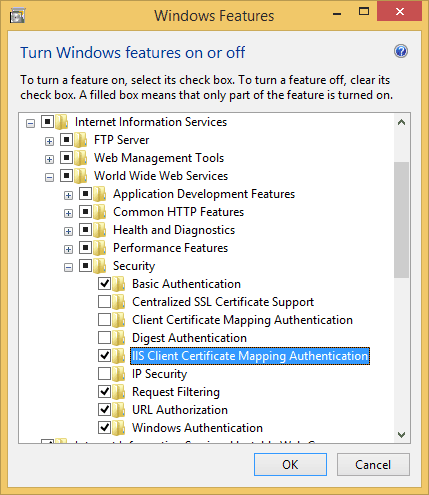
First of all, you need to configure IIS to allow client certificate mapping authentication. As you can see in the screenshot below, there are two types of these. We need the IIS Client Certificate Mapping Authentication feature. The Client Certificate Mapping Authentication feature is used for client certificate authentication using Active Directory.
Generate certificates
Next step is to generate certificates. Client certificate authentication requires that your website has an HTTPS binding so we first need a certificate for the server. To obtain this, we use a self-signed certificate that we add to the trusted root certificates store of the local computer and we derive both the client and the server certificate from this root certificate.
Self-signed root certificate
To generate the root certificate, use the following command line:
makecert -r -pe -n "CN=WebSSLTestRoot"
         -b 12/22/2013 -e 12/23/2014
         -ss root -sr localmachine -len 2048
The makecert command has a lot of options, some of which we use here:
-r |
Generate a self-signed certificate. |
-pe |
Allow the private key to be included in the certificate. We need this because we want to use the certificate to issue other certificates that are signed by this private key. |
-n "name" |
Certificate subject name. |
-b |
Validity start date. |
-e |
Validity end date. |
-ss |
Name of the certificate store that stores the certificate. Since we want to automatically trust this certificate, we store it with the trusted root certificates. You can find some more info on store locations here. |
-sr |
Certificate store location where the certificate will be stored (either currentuser or localmachine). |
-len |
Key length. |
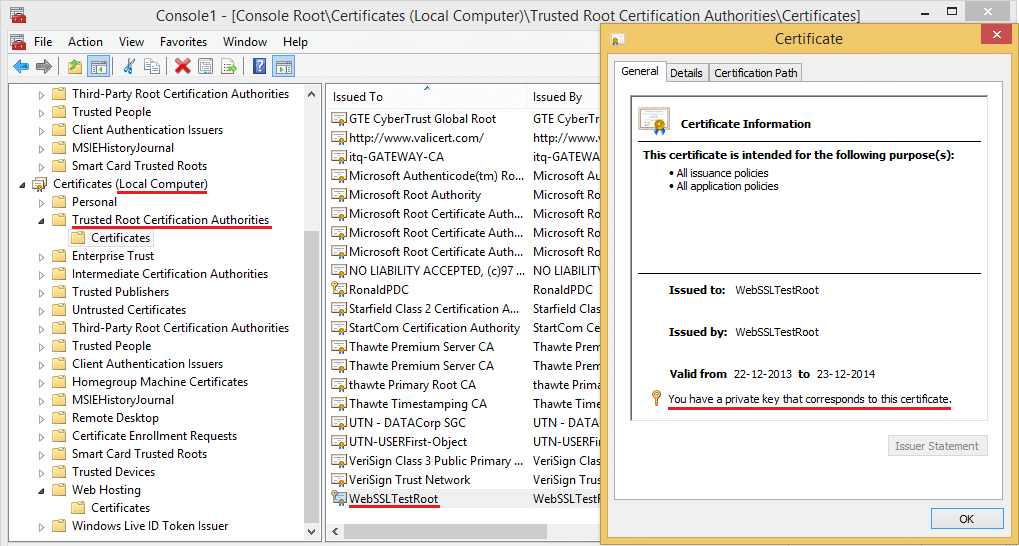
The result is a trusted root certificate as you can see in the screenshot below.
Server certificate
We derive the IIS server certificate from the root certificate we just generated with the following command:
makecert -pe -n "CN=www.sslclientauth.local" -b 12/22/2013 -e 12/23/2014
         -eku 1.3.6.1.5.5.7.3.1 -is root -ir localmachine -in WebSSLTestRoot
         -len 2048 -ss WebHosting -sr localmachine
This is no longer a self-signed certificate since we derive it from our own root certificate so the -r option is gone. Note that we use the subject name www.sslclientauth.local. This will become the url for the web site. Besides, we now store the certificate in a LocalMachine store called WebHosting. The new options we're using are to describe the purpose of this certificate and to locate the issuing (root) certificate we generated before:
-eku |
Describes the purpose of this certificate, which is to authenticate a server. Check here for more information on certificate OID's. |
-is |
The name of the certificate store where our issuing certificate resides. |
-ir |
The certificate store location of our issuing certificate. |
-in |
The subject name of our issuing certificate. |
The result is a certificate that can be used to verify the authenticity of a server, in this case a server named www.sslclientauth.local. The certificate is trusted because it is signed by a trusted (root) certificate as you can see in the following screenshot.

Client certificate
The last certificate we need is the client certificate. Since we already have a root certificate, let's derive the client certificate from it as well:
makecert -pe -n "CN=SSLClientAuthClient"
         -eku 1.3.6.1.5.5.7.3.2 -is root -ir localmachine -in WebSSLTestRoot
         -ss my -sr currentuser -len 2048
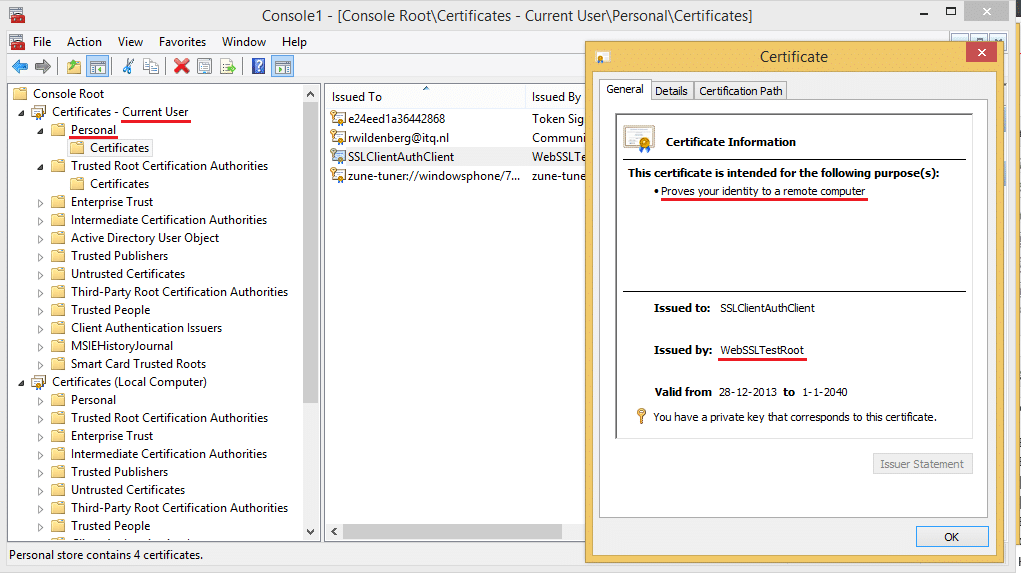
No new makecert are introduced here. The key purpose this time is client authentication and we store the certificate in the CurrentUser personal store.
Configure a test web application
I generated an empty ASP.NET 4.5.1 web project and added a basic 'hello world' page. Next step is to configure IIS. We add a new website and configure an https binding as shown in the following screenshot. The physical path points to the website I just created.
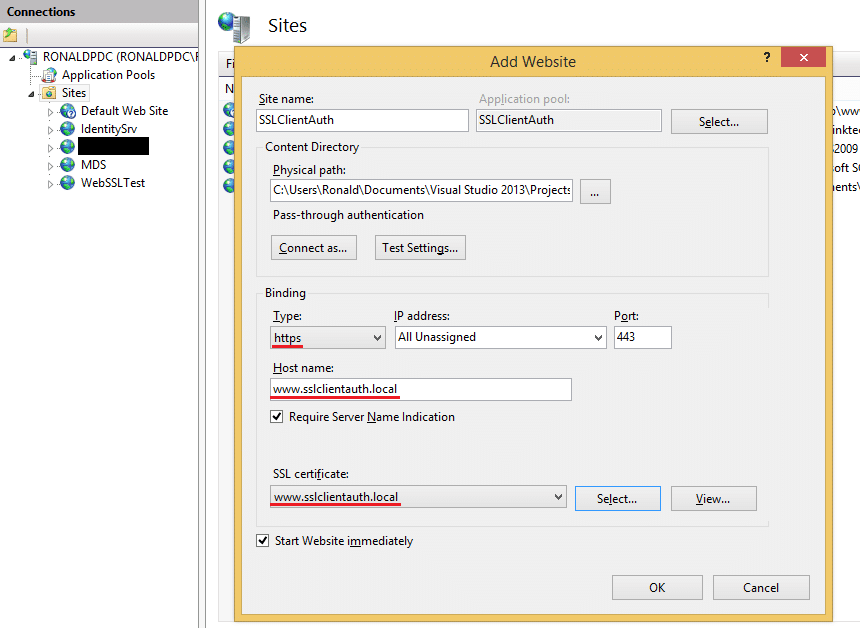
Most important are the https binding, the host name and the certificate. Make sure that host name and certificate match. The certificate that's selected in the screenshot is the one we created earlier. It can only be selected from the LocalMachine Personal or WebHosting stores, which is why I added the certificate to the latter.
The checkbox Require Server Name Indication (SNI) requires clients (browsers) to use the SNI extension to the TLS protocol.
Last step is to update your hosts file (in %systemroot%System32driversetc) to include the following line: 127.0.0.1 www.sslclientauth.local. This maps the address www.sslclientauth.local to localhost.
If all went well, you now have a website running with HTTPS. You can easily check this by visiting https://www.sslclientauth.local in a browser. Now for the client authentication part.
Configure client authentication
We already have a client certificate so all we need to do is tell the server that only clients using this particular certificate may enter and configure a client to use the certificate.
To configure the server part, first we must export the public key part of the certificate in base64 format. To do this, right-click your certificate in the MMC Certificate Snap-in and select All Tasks → Export.... Do not export the private key, select the base-64 format and a place to store the certificate. Open the certificate with a text editor, remove the BEGIN and END CERTIFICATE lines and make sure the certificate itself is on one line.
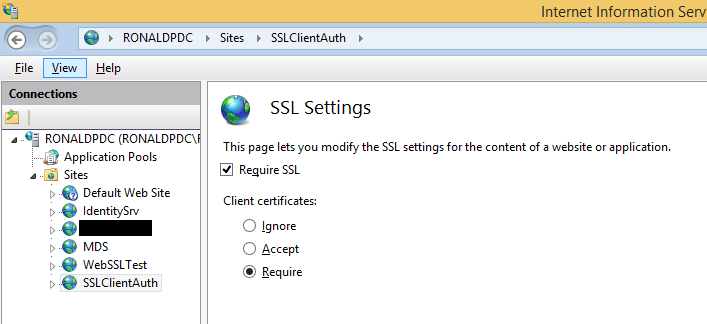
Now that we have the certificate, configure the server to actually use it for authentication. First configure your website to require client certificates:
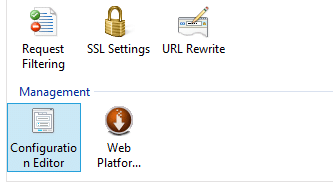
Next, open up the Configuration Editor for the website..
..and enter the following into the Section: text box: system.webServer/security/authentication/iisClientCertificateMappingAuthentication. Change enabled to True and click on the ellipsis on the right of oneToOneMappings. Click on the Add on the right of the dialog and paste your client certificate value to the right place (make sure it's really one line of text). Next, enter a valid username and password for your local environment.
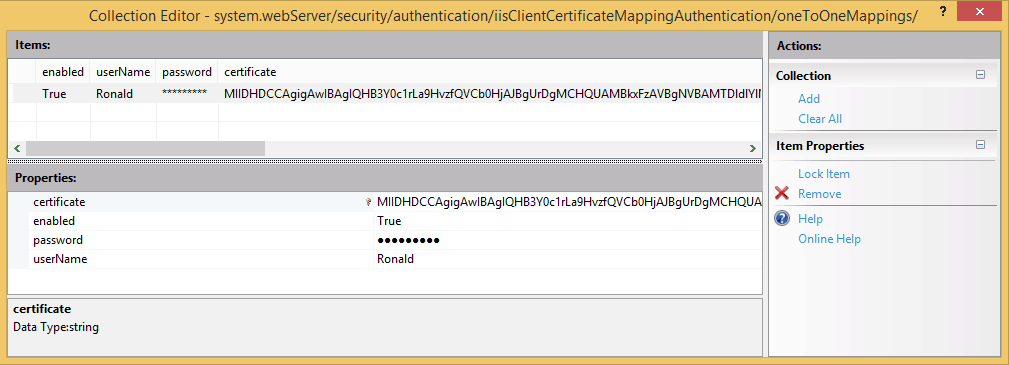
Exit the dialog and apply the changes. These changes will be applied not to your Web.config file but to your applicationHost.config file (in %systemroot%System32inetsrvconfig).
Testing
We should now have a valid setup that you can test so we open up a browser and go to https://www.sslclientauth.local. The browser should ask for a certificate:
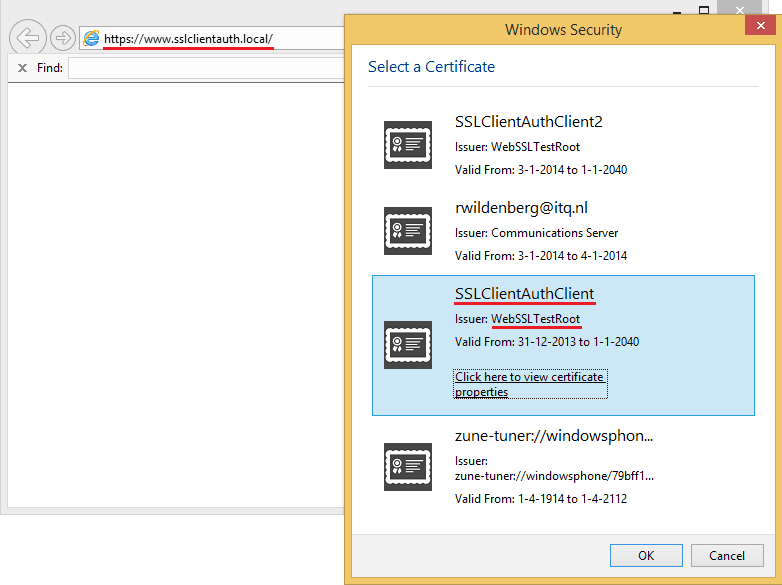
And we finally have access to our website!
Things that can go wrong
Incorrect username or password
When you do not enter a username and password or you enter incorrect values, the error you receive is a 401.1 - Unauthorized. This may suggest that there is something wrong with your certificate but that doesn't have to be the case. If you've entered incorrect credentials, you'll see error code 0x8007052e, as in the following screenshot.

Base64 client certificate incorrect
You have had to export the client certificate to base64 and then open the file in a text editor, remove the begin and end lines and remove all CRLF's. Something may have gone wrong in the process so you end up with an incorrect or invalid base64 string. You'll get a 401.1 - Unauthorized again. However, this time you see either error code 0x80093102 or 0x8009310b.
And finally...
Keep in mind that all we have done is to configure authentication, not authorization! If I present another client certificate that has a valid trust chain, I can gain access to the site as well. In one of the last screenshots you see a certificate named SSLClientAuthClient2. If I select that one, I also see my hello world page. The difference between both access attempts is that with a valid certificate I enter my website with an authenticated principal while with the invalid certificate I'm not authenticated. You'll have to specify authorization rules for your website or part of your website to actually deny users access.