This is part 3 in my blog series about porting Cloud foundry to Raspberry Pi. In this installment the stack elevator stops at level 1: BOSH Floor. On this floor we’ll find BOSH, the CPI and the stemcell.
BOSH
BOSH is the magic that deploys Cloud Foundry and keeps it running. The cool thing about BOSH is that it can do this on multiple cloud and IaaS platforms. To make the connection to different platforms it uses a Cloud Provider Interface or CPI for short.
CPI
So the CPI is the part of BOSH that allows BOSH to talk to all different kinds of clouds and IaaSes. Since we build our own IaaS we also needed to implement our own CPI so BOSH could talk to Bakery.
Building a CPI didn’t turn out to be the huge challenge I expected it to be. The heavy lifting was taken care of by Dmitri’s bosh-cpi-go package. From there it was just a matter of gluing the Bakery client package into the cpi-go package to get a basic CPI to work.
A few things that might be different from other CPIs:
- The hostname for the VM ehhrr… Pi is always the serial number of the Pi. The CPI just requests a Pi from Bakery without knowing which one it will get. The serial number is passed back from Bakery to the CPI. This is different then, for example, the vSphere CPI. Which generates a VM name itself and then creates a VM with that name in vCenter.
- Since each root volume is exported from the Bakery server itself up and downloading stuff to and from the Raspberry root volumes is pretty easy.
- This CPI also generates and uploads a disks.json file after deploying the Pi or when disks are changed. This file contains details for the Pi on where to find his disks.
I created a bosh release for the CPI to be able to actually use it. You can find it here. I never tried this CPI with bosh create-env and it probalby won’t work. At least it was never intended to be used that way. Instead, use the multi CPI feature of bosh to use it next to another CPI. Example cpi-config.yml below:
cpis:
- name: bakery
  type: bakery
  properties:
    url: http://192.168.192.19:8080/api/v1
- name: vsphere
  type: vsphere
  properties:
    vcenter:
      address: 192.168.192.123
      datacenters:
      - clusters:
        - cluster: {}
        datastore_pattern: '^ssd$'
        disk_path: pibosh-disks
        name: Datacenter
        persistent_datastore_pattern: '^ssd.+$'
        template_folder: pibosh-templates
        vm_folder: pibosh-vms
      password: P@ssw0rd
      user: [email protected]
Stemcell
Building a stemcell was one of the things that I thought would be easy and straightforward. Get some Linux, use some available scripts to turn it into a stemcell and you’re done. Right? Oh and to get started I won’t bother with the scripts or anything official. I’ll just take Raspbian lite, compile and install the BOSH agent, create a few users and groups, maybe a few directories and off I go…..
But then reality hit. Turns out a stemcell-ized linux machine does not really look like the original machine the distro deployed. And the BOSH agent isn’t merely a script executor, it takes over a lot of responsibilities from the OS itself. It mounts and formats disks for example. It tries to sync time if the OS didn’t do so itself. It does not rely on the OS to start monit. And there are a lot of other things the BOSH agent takes care of. I honestly did not know that the BOSH agent packs so much features in its tiny package. Must of the magic of BOSH seems to be in the agent, not in the BOSH director.
Disks
To keep the project moving I started working on a hand-built raspbian stemcell while Ruurd was working on the actual stemcell builder that would produce a stemcell that would be very close to identical with the official Ubuntu trusty stemcell.
It was during this process that I discovered all the requirements to run the BOSH agent. I also ran into some challenges which were very specific to my setup. One of the things I discovered is that the BOSH agent always needs an ephemeral disk. You can choose between re-partitioning your system drive or adding a separate drive that the agent then want to format for you. If the agent can’t re-partition the system drive or format another drive it will just exit. since in my case the “system disk” was an NFS mounted volume re-partitioning that wouldn’t work.
So this prompted me to implement the additional disk feature in Bakery, just to get the BOSH agent to start basically. As I wrote in my previous article all additional disks are presented as a disk image on an NFS export. The export needs to be mounted on the Pi and then the disk image needs to be loopback mounted from there. to trigger this process I mis-use the open-iscsi support in the BOSH agent. whenever the agent detects disk devices in /dev/mapper it assumes it is an iSCSI volume and call /etc/init.d/open-iscsi restart. So of course I placed my disk mount logic in the open-iscsi script :). It’s a hack but it works.
Monit
I gave monit a separate chapter in this article because I spent a freakin large amount of time trouble shooting this issue. Here is what happened:
I was hand building my raspbian stemcell and finally got the BOSh agent to start. Everything seemed fine until I tried to deploy an actual application to with BOSH. The Pi just refused to start any process through monit. Since everything was self build and non-standard I didn’t really know where to start trouble shooting. I spent hours and hours reading the BOSH agent log file. Found some minor issues that didn’t solve my issue but probably saved me some time later on.
I spent all my free time on this issue for more than two weeks. Luckily this was around christmas so I had a lot of free time to spent. My troubleshooting efforts went from comparing agent logs with a working machine to reading BOSH agent source code to BOSH director source code (ouch… Ruby… couldn’t make much sense of it). Until I finally concluded that the problem was in the communication between BOSH agent and monit. turned out that the Monit version in Raspbian was a lot newer than in official stemcell. I downloaded an Ubuntu trusty ARM image, copied the Monit binary to my raspbian image and everything started working!
Stemcell builder
Dr. Ruurd did the actual work on the stemcell builder so I’ll just give a summary here.
Our version of the stemcell bulder is here. At the time of writing I still have to backport a few manual steps into the builder. But the builder does produce a Raspbian compatible Ubuntu Trusty stemcell! Fair word of warning if you decide to run the stemcell builder yourself: It takes forever and a bit to produce a stemcell image on an RPi.
Changing the builder to produce ARM compatibly images was a bit of a hassle. Because building anything on a Pi takes very long the feedback cycle is very slow. We also found a lot of binaries which are pulled in during the stemcell building process. Of course these are x86 binaries, not ARM. In summary: we had to replace all those binaries, rebuild the docker image to be ARM compatible and wait very long.
There was also another interesting problem which I want to mention here. GNU tar from a docker image on an XFS overlay running on a Pi produces a corrupted tar. The solution was to compile BSD tar for RPi an use that instead of the OOTB GNU tar.
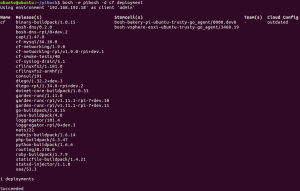
Below is proof we actually have working stemcells 

The original article was posted on: automate-it.today